Install Bitwarden & Sign In
First, let's get Bitwarden installed on your computer.
Click the link below to go directly to Bitwarden in the Microsoft Store:
🔗 Open Bitwarden in Microsoft StoreClick the blue Get button and wait for the installation to finish.
Launch the Bitwarden app. On the login screen, type your Guidehealth email address and click Continue.
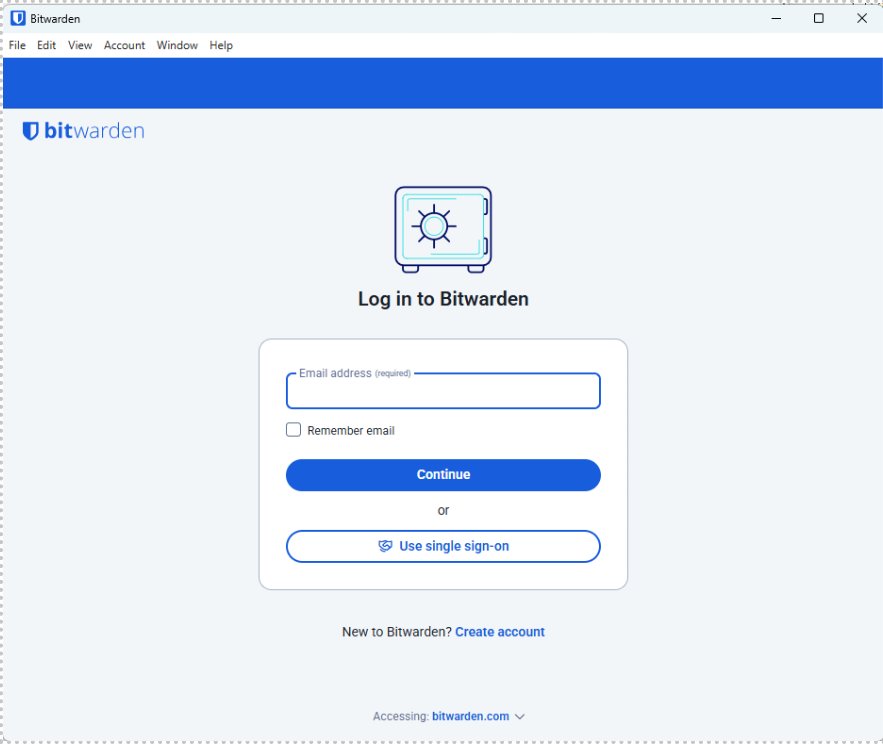
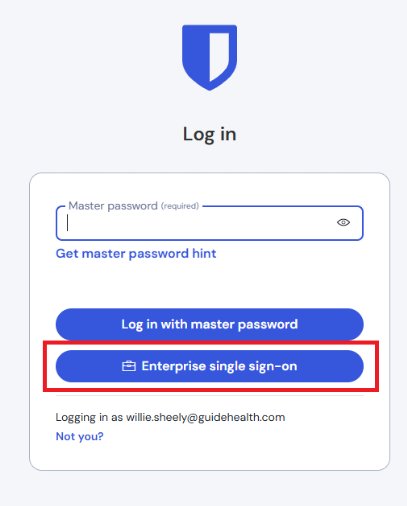
On the next screen, click Enterprise single sign-on (not the master password option). This uses your normal work login.
Complete the normal sign-in: enter your work email, password, and approve the MFA prompt (just like signing into other work apps).
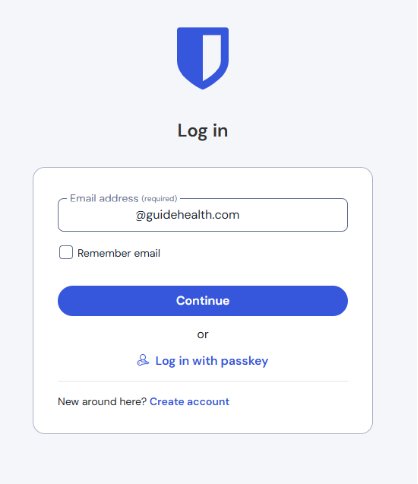
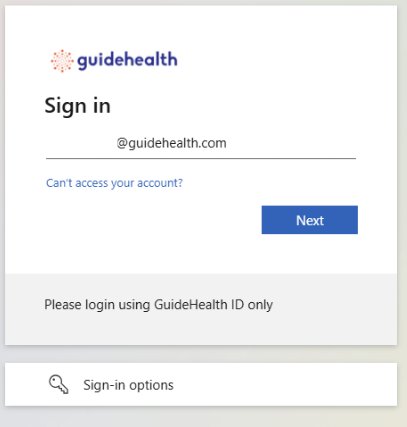
Enter your full @guidehealth.com email and click Next to complete the sign-in.
After signing in, wait for IT (Willie) to confirm your account is set up before continuing. You'll receive a message when you're good to go.
Click the link below to go directly to Bitwarden in the Mac App Store:
🔗 Open Bitwarden in Mac App StoreClick Get then Install and wait for the installation to finish.
Launch the Bitwarden app. On the login screen, type your Guidehealth email address and click Continue.
On the next screen, click Enterprise single sign-on (not the master password option). This uses your normal work login.
Complete the normal sign-in: enter your work email, password, and approve the MFA prompt.
Enter your full @guidehealth.com email and click Next to complete the sign-in.
After signing in, wait for IT (Willie) to confirm your account is set up before continuing.
👤 My Vault
- Personal banking
- Shopping sites
- Streaming services
- Personal email & social
🏢 Guidehealth (Work)
- EMR systems
- Client & vendor portals
- Work tools & apps
- Admin systems
Export Your Existing Passwords
Select where your passwords are currently stored and follow the steps.
Launch the Chrome browser.
Click the three dots in the top-right corner → Passwords and autofill → Google Password Manager.
Click Settings in the left sidebar.
Scroll to Export passwords and click Download file. Approve with your work email/password when prompted.
Save as Chrome-Export.csv in your PasswordExport folder.
Launch the Edge browser.
Click the three dots in the top-right corner (or press Alt+F) → Passwords.
Click Export passwords and confirm when prompted.
Save as Edge-Export.csv in your PasswordExport folder.
Open your browser and go to your LastPass vault. Sign in with your LastPass credentials.
Look for Advanced Options or Account Settings in the menu.
Click Export → Export vault data. Complete any security verification if prompted.
Save as LastPass-Export.csv in your PasswordExport folder.
Sort: Work vs. Personal
Open your exported file in Excel and label each password before importing.
In your PasswordExport folder, right-click the file → Open with → Excel. Click OK if Excel shows a warning.
Click the first empty column header at the far right and type Type.
Look at the website/URL for each row and type either Work or Personal in the Type column.
👤 Personal
- Banking & finance
- Shopping (Amazon, etc.)
- Streaming (Netflix, etc.)
- Personal email
- Social media
🏢 Work
- EMR systems
- Microsoft 365 / SSO
- Client & vendor portals
- AWS, admin tools
- Ticketing / HRIS
Click the header row → Data tab → Filter
Filter the Type column to show only Personal
Select all visible rows → File → Save As
Name it Chrome-Personal.csv (or Edge / LastPass) in CSV format
Change the filter to show only Work
Save As: Chrome-Work.csv (or Edge / LastPass) in CSV format
Import Into Bitwarden
You'll do this twice — once for personal passwords, once for work passwords.
Import Personal Passwords (My Vault)
In the menu bar at the top, click File then Import.
Under Destination → Vault, make sure My vault is selected.
Under Data → File format, select: Chrome for Chrome exports, Bitwarden (csv) for Edge exports, or LastPass (csv) for LastPass exports.
Click Import from CSV, then Choose File and select your Chrome-Personal.csv (or Edge/LastPass equivalent). Click the blue Import button.
Import Work Passwords (Guidehealth)
In the Bitwarden menu, click File → Import.
Under Destination → Vault, choose Guidehealth LLC.
Under Collection, find and select your name (e.g., GH Users / Your Name).
Follow the same steps as Part A, but select your Chrome-Work.csv (or Edge/LastPass work file). Click Import to finish.
🚪 Need help? Contact IT (Willie) if anything doesn't look right or you have passwords you're unsure how to categorize.
Install the Browser Extension
The browser extension lets Bitwarden automatically fill in your passwords as you browse — no more copy/pasting!
Click below to open the Bitwarden page in the Chrome Web Store, then click Add to Chrome:
🔗 Add Bitwarden to ChromeClick the puzzle piece icon in the top-right of Chrome → find Bitwarden → click the pin icon next to it. The Bitwarden shield icon will appear in your toolbar.
Click the Bitwarden shield icon in your toolbar. Enter your Guidehealth email, click Continue, then choose Enterprise single sign-on and complete the Microsoft sign-in.
Click below to open the Bitwarden page in the Edge Add-ons store, then click Get:
🔗 Add Bitwarden to EdgeClick the puzzle piece icon in the top-right of Edge → find Bitwarden → click the eye icon to pin it. The Bitwarden shield will appear in your toolbar.
Click the Bitwarden shield icon in your toolbar. Enter your Guidehealth email, click Continue, then choose Enterprise single sign-on and complete the Microsoft sign-in.
⚡ How to Use the Extension
When you visit a site with a saved password, click the Bitwarden shield icon in your toolbar and click the matching login. Bitwarden will fill in your username and password automatically.
When you log into a site for the first time, Bitwarden will ask if you'd like to save the login. Click Save and it will be stored in your vault.
When creating a new account, open the extension and click Generator to create a strong random password. Bitwarden will save it for you automatically.
Click the Bitwarden shield icon at any time to search your vault and copy passwords — handy when auto-fill doesn't trigger on its own.